How to Optimize Campaigns on Ero-Advertising
Last updated on May 21, 2018 by André Beato 7 min readThe time has come to start working hard on Ero-Ads!
Following our last article on how to create an Ero-Advertising campaign.
This article will describe the main process of a campaign’s optimization and analysis in detail, as well as the optimization possibilities available to you.
In order to understand all the steps and the content on this article, it’s crucial that you already are a user of this specific platform.
I suggest you check the previous articles we’ve written about Ero-Ads.
Now let’s get started!
Statistics
You can access this menu on Advertisers -> Statistics
This is the main menu for data in Ero-Ads. It has many display options regarding Time period (Time spectre/display type), Type of Traffic, Type of method, Campaign Groups and Currency.
My tip for this menu: always choose the right time period of optimization (e.g. take the last 3-5 days, depending on the segment volume) for your campaigns and take the same period on the Mobidea platform.
Moreover, on the “Display by” box, the option “Summary” is the most efficient on delivering data for the period you’ve selected.
The other parameters are a little less relevant.
Leaving them as they are will show all the data from your campaigns in the same way.
Banner
By clicking on the plus sign in “summary” and in the campaign you want to optimize, you’ll be able to see each banner’s performance.
In this case, the CTR is definitely the metric you should check since it’s highly correlated with banner performance.
See the image above?
You’ll see 3 active banners and different performances, 0.98%, 1.63% and 1.77% CTRs. The banner 728x90_ES_Download_Playnow_Red has the lowest CTR so it’ll be replaced by a new one. I’ll let the other ones run. (I picked an example with low volumes, just for example purposes).
My advice is to stop the banner and upload a new one on the campaign edit.
Websites
The next optimization step in a banner ad campaign is analyzing the websites.
To get there, you’ve gotta click on the total campaign views/impressions, not on each banner’s views (it will display the sites’ statistics by banner).
After doing this, you’ll want to have your list of websites displayed by domain in order to have a more effective look at them and not only their zones.
When you reach this point, it’s fundamental that you’ve already implemented the dynamic tracking tool in your Smartlink (in particular domainname) that I’ve mentioned before, in order to use all the info you can or use a tracking platform (we have automatic integrations in our platform).
You may import data to Excel, so you can better organize it and save your time.
You can order by costs or CTR, which is really important, not only for the banners discussed earlier but also for the websites.
Generally, when checking websites, it’s more effective to start by checking the ones that have high costs and blacklist them if you get no profit.
You can notice that these websites are the ones which also have a lower CTR.
You may also order by CTR, then proceed with the same analysis.
Later, move to the opposite perspective, which is checking the top revenue domains on Mobidea in order find the really good ones.
You may create a white list or even a CPM campaign which I’ll get to in the next Ero-Advertising article.
Again: you may order by CTR and try to find websites that still have a low number of conversions but have a high CTR.
They may be the hidden gold mine that makes you get that royal paper!
Let’s analyse these specific campaign cases:
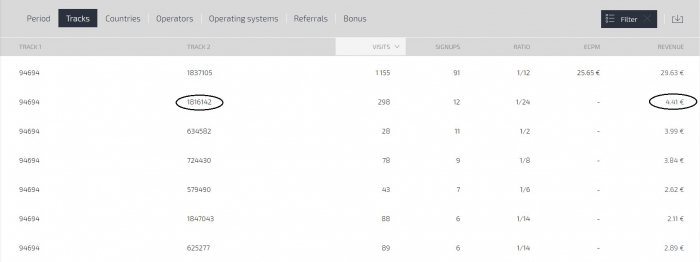
- domain 1816142 has costs of around 2.27€ and has made only 4.41€ in revenue – that’s the type of site you’ll want to add to a whitelist because it generated a margin of 94% and has a relevant number of signups.
By having a closer look, you’ll notice that the site’s CTR is pretty high compared to the rest! Indeed, there’s a correlation between high CTRs and good performing websites.
Got it?
You should always watch out for high CTRs!
In a negative side, you have domain 1815864 with 0 CTR.
The main technique to optimize bad websites in Ero-Ads is to check low CTRs, adding them to the blacklist.
Domain 1822212 has a cost of 3.17€ and 1.61€ in revenue with 3 conversions.
Knowing the payout is 0.53€, the website’s eCPA is cost/signups=1.06€.
The eCPA is double of the payout, so this site should be cut.
As you can see, website optimization may be separated in blacklists and whitelists (but not only).
In the next topic, I’ll let you know how to apply these filters to your campaign.
In a future article, I’ll also explain why it’s so important to create specific CPM campaigns, targeting specific website spots, along with some new tricks for you to keep in your head like awesome mantras!
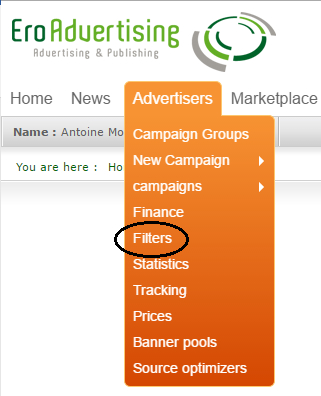
Filters
Blacklist
The recipe to create both types of lists is similar.
Start by selecting the domains you wanna stop by clicking on the left box of the domains and then on the top of the webpage where you’ll insert the final info.
Use the Domain filters (exclude) – in order to create a Blacklist.
After this, name the filter you wanna create, so you can associate it to this specific campaign later on.
Now click on “Add to filter”.
Your blacklisted sites should look like this after you’ve added them to the filter.
Every time you want to cut a website, all you have to do is select it and click on “Add to filter”.
It’ll be flagged red, as seen on the picture above.
Whitelist
You proceed exactly like you would for the “exclude” case.
You start by selecting the websites you wanna target.
In this case, you have to select domain filters (include) – in order to create a whitelist.
You can create an “Include” filter but then you’ll have to go to the campaign edit and apply the filter you’ve just created to the campaign on the following box.
You can also go to the Filters page, go through the whole process there and then apply it to your new WL campaign.
Inside “Filters Menu”, you can manage filters and edit them.
For instance, you can create a WL but then notice a website’s performance has totally changed.
Going to edit filter, unselecting it and saving will solve this issue and it’ll be automatically applied to your campaign (in this case).
Bidding
If you’re optimizing the campaign for the first time, make sure you have a decent amount of data available for you to analyze.
Afterwards, you should take the value of your eCPM into consideration in order to know if you’re bidding an unaffordable value.
Do it by taking the same period of time for the revenues (Mobidea platform) and impressions you have (Ero-Ads platform).
If you’ve got a tracking platform, you can check both the data of Ero-Ads and Mobidea there.
The most effective way to change the bid is by selecting all banners, clicking on the “Action” tab and “Update Price”.
It’s a good practice to consider trying to put it a little bit above the eCPM to check whether or not the next position above you is far away, as I’ve mentioned earlier in this article.
If the next position is in the reach of a few cents, go for it!
I hope this article has helped solve your dilemmas after creating a campaign.
At the start, not knowing what to optimize can definitely be tricky.
Nonetheless, these tips are pretty helpful for you to start making serious money on this ad network.
I know this article was all you needed to get to a whole new level on Ero-Ads!
But wait!
Think it’s the end?
Not even close!
Keep checking the Mobidea Academy for more great content!

André Beato
Account Manager
André joined Mobidea in February 2016 and started working as a full-time Media Buyer. He specialized in LATAM traffic and focused on managing and creating largely profitable campaigns in various ad networks. At the moment, he's focused on helping his affiliates reaching their goals with his insights and expertise. Apart from loving to work at Mobidea, André really likes to travel, to spend time in the mountain riding his bicycle and he loves exploring Portugal's natural hidden spots.
It's finally time for you to learn how to create a profitable campaign on Ero-Advertising, one of the world's most important ad networks!
Ero-Advertising CPM campaigns deserve a chapter of their own so go ahead and read this CPM tutorial to improve your performance!
Check the fourth installment of our 5-part media buying mistakes series and understand why you must never make these blunders in your campaigns!


