PlugRush Review: All You Need to Know
Last updated on May 17, 2022 by Valentin Shevchenko 11 min readPlugRush History
In this PlugRush review we’ll talk about a traffic source known for providing high-quality traffic since 2007.
The major part of the traffic you’ll find in PlugRush is Adult. Go ahead and run campaigns there if your offers are dating, adult content, adult pin submits, adult gaming. The Top GEOs for their Adult Popunder traffic are US, IT, ES, FR, DE, IN, RU, UK, CA, ZA, MY, VT, NL, TH, AU, PT, SE, BE, PL.
There’s also Mainstream Popunder traffic available for US, ES, UK, IT, DE, CA, FR, UAE, AU, RU, NL, BE, SE, SG. Your Sweepstakes offers will match perfectly with such traffic.
To follow the trend, recently PlugRush also launched Push Notifications and made them available for both Adult and Mainstream traffic.
I worked with PlugRush from the time when they were focused on Popunder traffic and didn’t have anything else in their inventory. Nowadays things have changed, and they offer other ad formats:
- Banners
- Native
- Redirects
- Push
That being said, Popunder still dominates in volumes compared to the other formats.
Don’t get me wrong!
There is no need to focus exclusively on Popunder traffic because of its predominated volumes.
According to my account manager, other formats perform just as well since their traffic comes only from trusted sites with good quality.
For example, if we take a look at Native, PlugRush even tried to redefine it in such a way as to upgrade it.
It isn’t a secret that many users got tired of Native ads and developed the so-called “banner blindness.”
To overcome this, PlugRush introduced a new format called “Real Native Ads”, which, as they claim, is indeed the ‘Real’ Native.
Check the screenshot below for some visual cues:
Real Native Ads are a new format from PlugRush that would fit perfectly into the content of any site, and users see it as a part of the real content.
PlugRush Overview
When I first started working with PlugRush about five years ago, I was quite surprised by their interface. It was hard to navigate and find things, and the overall experience was far from user-friendly. If it wasn’t for a friend of mine, who showed me how to work with the platform, I probably would have spent many days trying to figure out my way around.
In contrast to my first experience, PlugRush has completely re-designed its system now.
It looks pretty modern and what’s important is that it’s quite convenient to use.
Let’s observe it together!
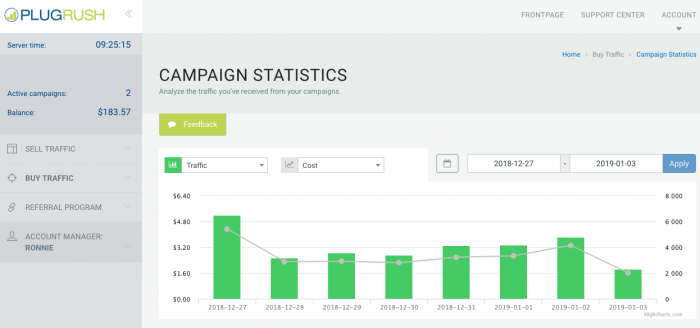
On the left sidebar you will find information about your Active Campaigns, Remaining Funds and Navigation Menu.
In this review, we will cover only the Buy Traffic section of an Advertiser account.
So note that everything we will be discussing next occurs in this section.
On the right you find a graph with variables you might want to analyze about your traffic.
There is an option to generate a graphic report for any period of your choice.
You can also combine two graphs together, for example, the average position and the cost per click to see their correlation.
In the same way, you can choose a certain campaign and analyze it separately.
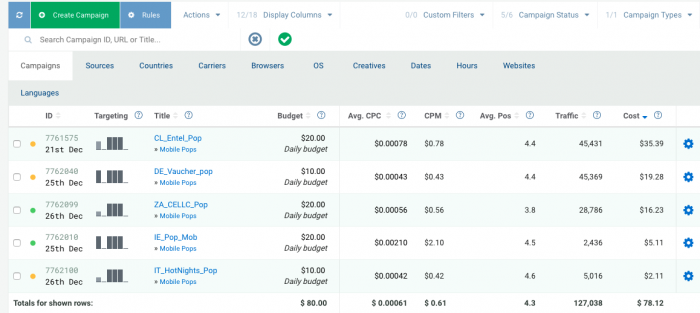
There is a list of Campaigns in tabular format right below the graph.
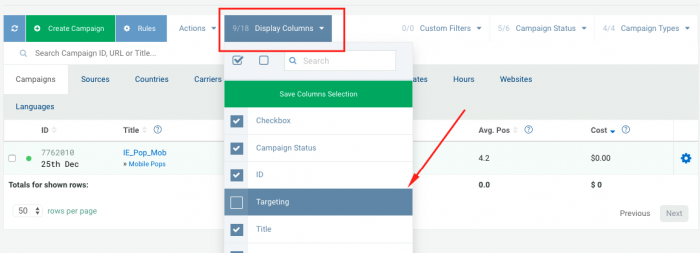
Feel free to add or remove columns as you like. It’s quite easy to customize the view of the table in a way that suits you.
In order to be highly efficient when analyzing your traffic data, you have to be organized. When it comes to viewing your data and monitoring specific information, PlugRush came up with the Display Columns feature that allows you to choose which metrics and key performance indicators you want to look at in your stats.
This feature makes it easy for advertisers that use postback because it allows them to have their conversions, amounts, ROI, profits etc automatically calculated in the system.
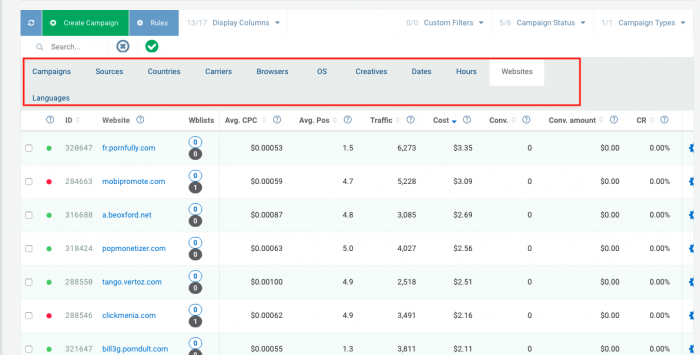
On the same page you also can make an analysis based on the following parameters:
- Sources
- Country
- Operators
- Browsers
- OS
- Creatives
- Date/Time
- Websites
- Languages
By the way, in both Sources and Websites tabs you can add your white/blacklists.
But keep in mind that they have to be created in advance.
Let’s leave this talk about White or Blacklists for later, when we’ll proceed to optimization discussion.
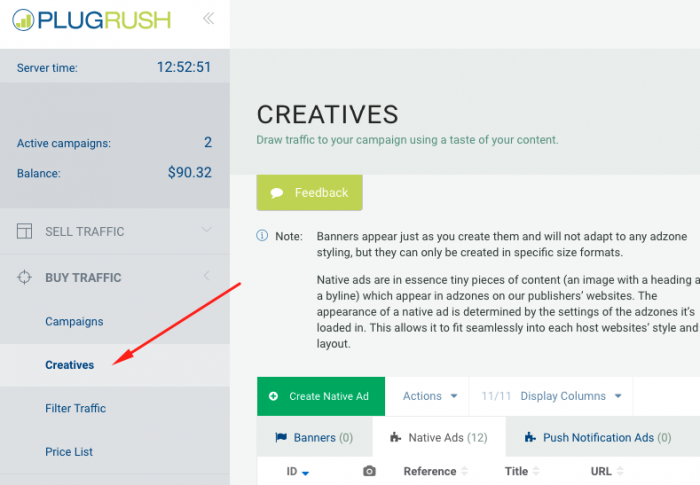
Now, it’s time for the Creatives section!
I will define it as a library of banners, native and push ads.
That’s the page where you should add your Creatives before launching a campaign for any of these 3 traffic types.
When adding Creatives, you can browse or simply drag the images or enter an URL. Also, you can browse your previously used Creatives which is especially useful when it comes to native ads and push notification ads.
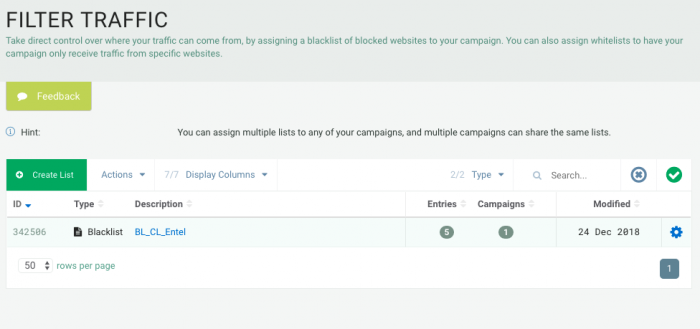
Then we have the Filter Traffic tab.
It can help you create a library of Whitelists and/or Blacklists.
It’s a page where you manage your Websites to White or Blacklists is here. You can add or remove Websites from or to each list.
Also, here you can link your White or Blacklists to a required campaign. You can assign a list by default to all your new campaigns. So if you are creating a universal blacklist you can automatically add it to all your new campaigns.
Finally, the last tab inside the Buy Traffic section is Price List.
Here you can check the minimum rates of PlugRush’s inventory countries.
We will face the costs, prices, bids, scores and estimated volumes in details later on, at the stage of Campaign Creation.
How to Create a Campaign on PlugRush (Step by Step)
If you don’t have an account on PlugRush, sign up here.
So let’s begin with the Campaign Creation on PlugRush.
Everything here is fairly standard and understandable, though I will mention the main points and differences which you won’t find in other traffic sources.
Before we start creating a campaign, we should add a Traffic Source to a Tracker.
PlugRush is already integrated with such Trackers as Voluum, BeMob and Binom, and of course with Mobidea Tracker too.
If you don’t use a paid tracker, check Mobidea Academy’s list of the best affiliate trackers in the market. Mobidea Academy has exclusive discounts with all the major trackers, check them here.
But if you need to add PlugRush to your Tracker manually, here is a list of macros/tokens:
{$browser} the browser name
{$campaign_id} the ID of the campaign
{$cc} two letter country code of the visitor
{$click_id} click_id used for conversion-tracking / postback
{$cpv} the cost per visitor (cpc)
{$domain_id} a unique ID of the traffic source / website
{$source_id} a unique ID of the traffic source. ID’s beginning with an R represents referrals, while ID’s beginning with a S represents the source
{$source_referrer} the referrer of the traffic source
{$orientation} the orientation of the source / website
{$os} the operating system of the visitor
Now we are ready for Campaign creation.
In Buy Traffic section -> Campaigns, click on the Create Campaigns button.
Fill in the following fields:
Name your campaign: specify the name of the campaign
Audience: Target adult traffic / Target mainstream traffic
Delivery method: Desktop / Mobile
Method: Traffic type – banners, native advertising, native advertising blind, popunder, push or redirects.
For this review, I will create a campaign for Pop traffic.
It’s simple! I just chose a Pops in Delivery Method.
The next element of your campaign is a Tracking URL or an Offer URL.
Just add a link with your parameters here:
Let’s move to Targeting!
From the title it is clear that here we will specify the targeting parameters of our campaign.
All countries are selected by default.
Thus, click on Quick Select and select None to clear the default selection.
Then find the country you are going to run your offer for.
Once you selected a country, continue to the next parameters.
Language, Operating System, Browser – these are known as a standard setting.
But in the Orientation tab, you can actually select something more interesting, especially for Adult traffic.
It’s sexual orientation!
Another important point, if your Offer requires certain Carrier Targeting you have to specify this in the Connection Type tab.
Go and select a Mobile network traffic (3G/4G) to be able to see a list with cellular operators.
Jump to Carrier Tab to select mobile operators for your offer.
That’s where Targeting settings ends.
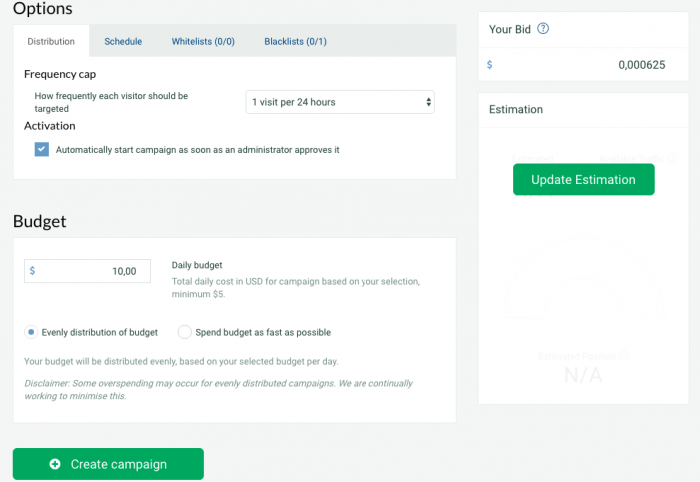
Let’s move to the next part – Option.
In this part it is important to specify the frequency capping of ad display per user.
The default is 1/24, which is quite classic.
Here is a tick that allows to start a campaign immediately after moderators approved it.
In the same part you can set a schedule of your campaign.
It might be useful if your offer is designed for an audience which active in certain hours or days of the week.
Also, if during a testing phase you noticed that some of time intervals convert better than others, you can choose them to get the most of your impressions / clicks / conversions to be distributed during this particular time.
In the Options view you can specify White or Blacklists which you’ll need in this campaign.
In the Budget part you can set your daily budget. The daily budget of campaigns is a very important parameter.
If necessary, you can always increase your daily budget. But if you don’t specify it in the first place, there is a chance to run out of budget pretty quick.
You don’t want this! Right?
Another important setting is how quickly the budget will be spent: Impartially or accelerated.
I’m sure that you noticed a zone called Estimation on the right side of the page.
This is an important tool which allows you to predict
- a total amount of traffic
- how much of total volume you might get
and the most important one
- a rough estimation of the traffic quality. Average position. This is the interesting part since it allows you to see your placement among the competitors, based on the bid you’ve chosen. A higher bid goes hand in hand with a higher average position. The top average position that you can get is 1. That means you’ll be the highest bidder. So the largest portion of the traffic will go to your campaign. The lower the average position, the less traffic you’ll receive.
I emphasize that this is only an estimation based on previous data from the same or similar targeting. This rating does not take into account either yours nor your competitors’ White or Blacklists. So I don’t advise you to trust you completely. It’s called estimation for a reason. 😉
You can understand how quality of traffic changes by looking at your bid. By bidding higher, you’ll receive more traffic there for the quality will go up as well. By bidding lower, you’ll get basically the remains of the traffic where the quality is not expected to be high.
The higher the bid, the more traffic you can expect to buy, and higher numbers of “fresh” users you will get. In other words, your chances to get conversions will increase accordingly. All collerated to the payout of your offers. Of course, the payout dictates the margin of your profit. Take that into consideration as well when bidding.
The maximum score of the Average Position is 1.0.
This is the perfect score, which means that you beat all bids of your competitors, and now visitors will see your advertisement on first.
If the Average Position is 3 or less (that is, from 1.0 to 3.0), you can consider yourself in a good position.
You will get the biggest number of visitors who haven’t yet been overwhelmed with ads shown to them in the last 24 hours.
The Average Position of 3.0 – 4.5 score indicates that you are in a range of ad impressions which reduces your chances of conversion. In the majority of cases, this is not a favorable position for many offers and you might want to increase your bid.
And, finally, the score is 5.0 or more is the least favorable position. Even though such traffic may still be acceptable for Banners or Native campaigns, for Pop ads it’s really unwanted.
Once a bid is selected your campaign is ready to be saved.
Simply press a Create Campaign button to send your campaign for moderation.
The moderation process is reasonably fast especially if you compare it with other networks.
Campaign Optimization
After a campaign runs for some time and receives its first conversions, you can proceed to the optimization stage.
Let’s start by turning off domains which won’t bring a single conversion.
To do this, we’ll create a blacklist and place these sites there.
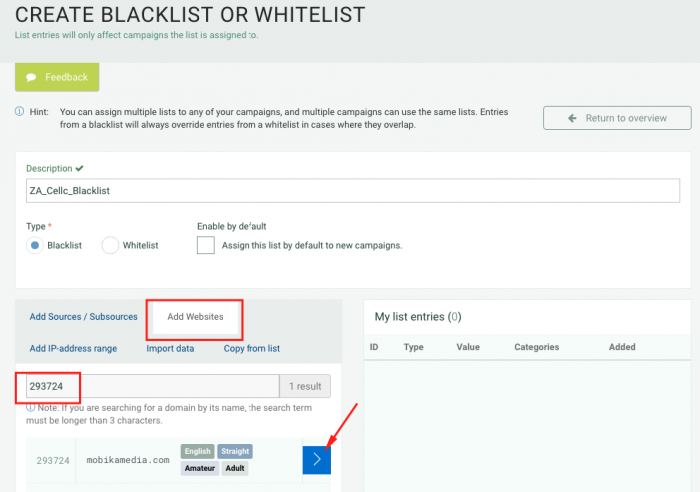
In the Filter traffic section, click in the Create list button.
Give an appropriate name to your Blacklist, so later on you can easily understand which traffic sources are included without the need to open a list.
For my campaign I made a Blacklist for ZA country and Cellc carrier, and I named it accordingly.
Don’t forget to tag a Blacklist and add unwanted sites in the Add Websites field.
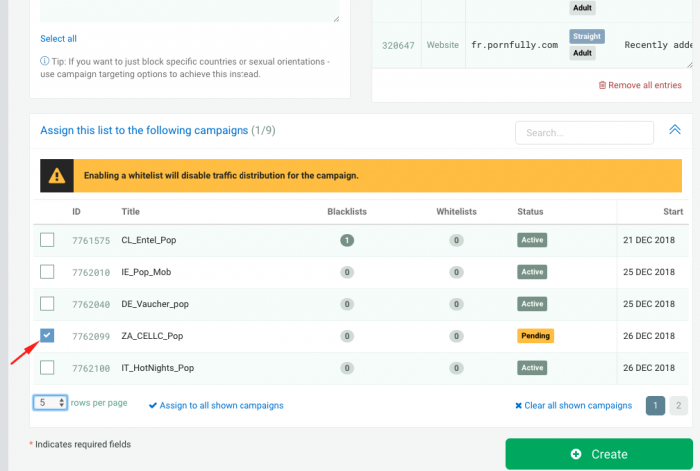
When all websites are transferred to Blacklist you can link your list to the desired campaign.
Select a Blacklist name and press the Create button.
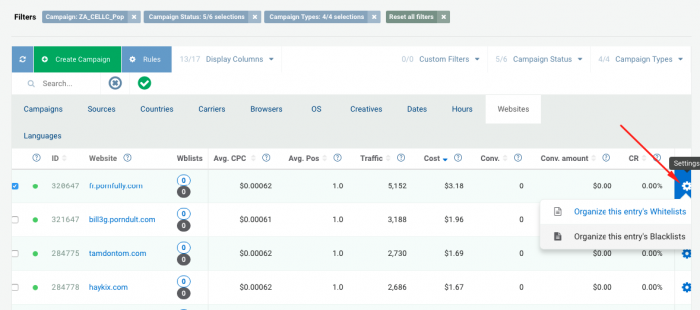
It’s worth mentioning that when you create your Whitelist or Blacklist, you will be able to add new websites there right from the Statistic page of your campaign.
To do so, go to Campaigns section, select Websites and click on the ‘settings’ icon on the right.
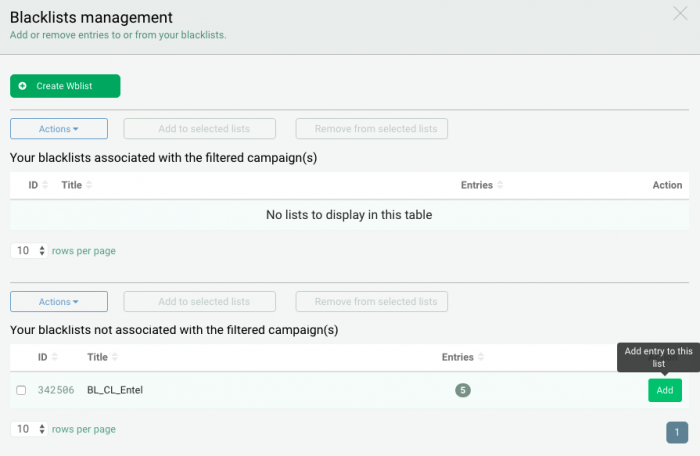
You will see an option Organize entry’s Blacklists. That’s what you need!
On the form, click Add next to the appropriate list:
The main aspect I want you to focus on is that in PlugRush, besides the usual website optimization, you can optimize campaigns based on Source and Sub-source.
Why would PlugRush make such a massive change?
In fact, each Website in PlugRush is stored and recognized by its unique domain.
However, each domain may include a dozen or even hundreds of Ad Zones.
If you disable an entire Website, then all included Ad Zones will be disabled. This is not good as some of them might be actually profitable for you.
An optimization only based on the registered domain simply won’t good enough.
Now, thanks to a breakdown up to sources and sub-sources you can by far improve your optimization.
How to create a Source white or blacklist we already spoke of in the section when discussing Sources. While speaking about Sources and Sub-sources let’s also discuss an extra-option for optimization.
When your campaign is launched it receives no more than 5% of possible traffic from each Source, and no more than 1% from a Sub-source.
This restriction is made to avoid situations when immediately after a campaign launch you receive tons of traffic from the biggest sources which don’t really fit your offer.
However, after the campaign has run for some time and received conversions, you can remove this restriction from the suitable for your offer.
In my example, I will show you how to proceed with removing this restriction.
Go to the Statistics page.
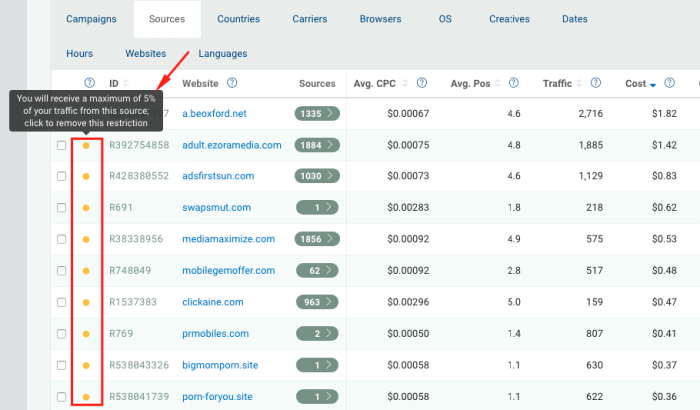
There all your Sources are marked with a yellow dot.
If you move your mouse over this yellow dot, you will see that traffic volume from a Source represents 5%.
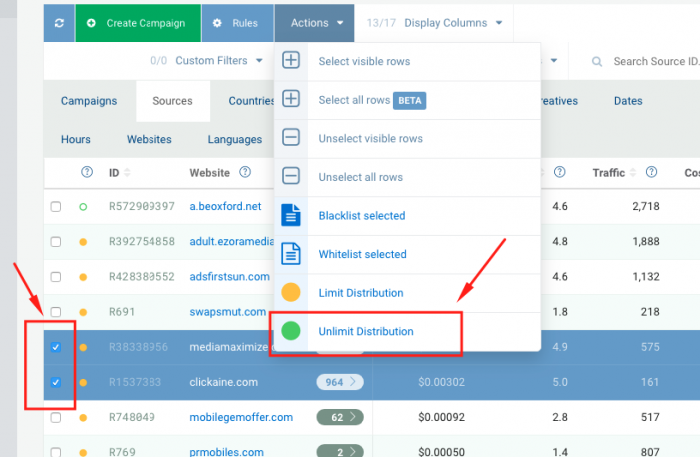
Based on my statistics, I found Websites which provided traffic suitable for my offer.
I selected them and chose Action => Unlimited distribution.
Don’t forget to confirm that you really want to remove a restriction from Sources, i.e. “Unlimit distribution”.
When I confirmed that all selected Sources changed color from Yellow to Green.
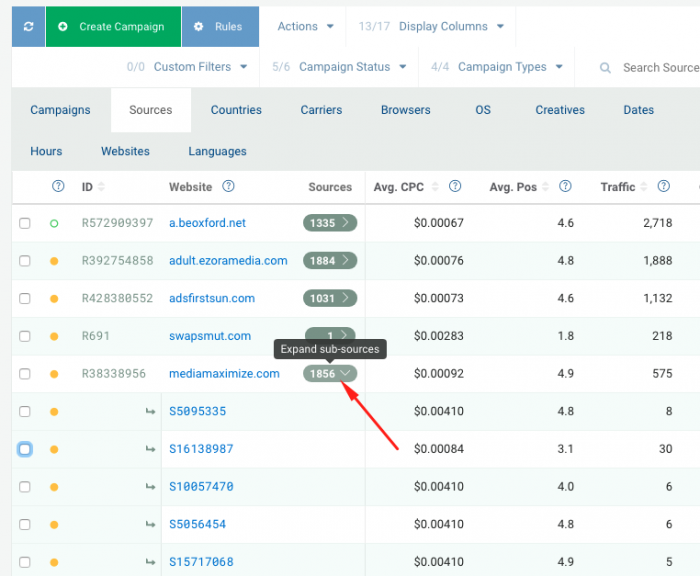
You can do the same action with Sub-sources.
Click on Source to breakdown it into Sub-sources and repeat what we just discussed above.
This way you can increase volumes of traffic very precisely, only from Sub-sources that brings you the best results.
Another important feature in PlugRush is an Automatic Campaign Optimization.
PlugRush allows you to set up a rules following which your Optimization will happen automatically.
This feature is available to all PlugRush users and it’s FREE.
It’s especially useful if you have a large number of campaigns along with many traffic Sources.
Automatic Optimization can help you to save time and efforts spent on optimization.
To view in detail how automated rules work, read this blog post.
Offers & Verticals
Ad Types: Popunder/Banner/Native/NativeBlind/Push
Cost Model: CPM/CPC
Verticals: Adult/Mainstream
Payment & Investment
Minimum Deposit: $25 or $10 when using PayPal or Paxum
Payment Methods: Credit Cards, PayPal, Paxum, Wire Transfer
Support
Personal Account Manager: Yes
Support Response Speed: Average
Support Rating: Average
Contact Methods: Skype/Email
PlugRush Verdict
To sum up, it’s clear that PlugRush is growing, evolving, adding new and useful features.
Personally, I like its modern interface, convenient reports and optimization features.
You can build reports based on many various parameters.
Additionally, if you connect your PlugRush account with a partner network, you will be able to pass your tracker data (conversions) directly to PlugRush interface.
This will save you time and make it easier to analyze and optimize data right there on the spot.
And last, but not least, you can also create an automatic optimization rules.
The quality of traffic can be seen from the results of my test campaigns.
Some GEOs converted almost immediately and showed a positive ROI without any optimization from my side.
After some time I could start optimization and my test offer for IE showed following results.
In this review I tried to highlight the most important points which help you start working in PlugRush.
Pros
- User-friendly interface
- Good analytics
- Optimization by Sub-sources
- Big volumes of pop traffic
- Good quality traffic
- Quick moderation
Cons
- No payments via WebMoney
- Volume estimations for Push ads are only visible in the price list tab

Valentin Shevchenko
Professional Media Buyer
Valentin Shevchenko is an experienced media buyer who’s been enjoying the crazy life of online marketing for the last 5 years as a freelance affiliate or occasionally collaborating with different teams. He’s mostly focused on Nutra, Crypto, and Dating offers and lives in Kiev, Ukraine.
Read our in-depth SelfAdvertiser review and learn how to start working there.
This fantastic PropellerAds review is gonna show you how to explore a network that's remarkably famous for its pop traffic!
Editor's note: Go2mobi is no longer available. Check this Go2mobi review and understand how to make money on Go2mobi like an expert!
