Voluum Review: Hidden Tricks, Pros & Cons
Last updated on June 21, 2023 by Mobidea Academy 16 min readIntroduction
Life teaches us valuable lessons.
One of the most important ones is that you should always track your actions so as to be able to understand which have a positive influence on your results and which should be changed so that you can achieve concrete results.
If you think about the Media Buying process, you’ll understand that it’s the same reality.
Indeed, it’s super important for you to be aware of what campaigns are running, what’s the targeting you’ve got, the bids, which changes you’ve applied, what profit each campaign is bringing you, etc.
That’s why a tracker like Voluum is a must have.
The Updated Voluum Review (and Guide)
Trust me: this isn’t exactly a walk in the park when you’ve got around 1000 different campaigns you need to look after!
Don’t worry, though!
Fortunately, the market offers a whole lot of solutions that will surely help you get it all together!
These tools are crucial for you to always keep your Media Buying activity well-organized.
In this article, I’m gonna tell you about a useful tool which can gather info from all your partners, match it, and give you what you need to know when analyzing stats:
Voluum.
Why is Voluum So Powerful?
Experience in affiliate marketing
Voluum was founded by the owner of zeropark.com, an ad network.
This means it flourished from an affiliate marketing business and it’s based on the needs and requests of affiliates.
Moreover, it develops in tune with new market trends.
Very fast
Voluum is one of the fastest solutions in the market, mainly thanks to its 7 data centers, which allows it to redirect users to the closest data center.
This obviously has a positive influence on both speed and click loss.
In addition, if one data center experiences a technical issue, there are 3 more which can replace it in order to keep it going smoothly.
Self-hosted
Another great feature of Voluum (unlike many other tracker solutions which are Self-Hosted) is Cloud hosting.
This can be extremely important for the beginner Media Buying newbie that’s only now starting to take the first steps in the business.
In Cloud solution, you don’t need to invest in separate servers where you’ll install a self-hosted tracker.
This will save you a lot of money.
Additionally, you can use the Cloud solution in order to run in any country since it has CDN around the globe.
Now let’s imagine you were to use a self-serve tracker and your server was based in Europe, but your target audience was in Asia.
What happens then?
A redirection delay can last for several seconds, which will negatively influence your profit.
There are two drawbacks to Cloud solution, though.
First: it only stores data for a limited period of time.
Thinking about checking one-year-old stats? You can have 12 months of data retention on the Grow plan or even more on the Agency plan.
Second: the most important flaw.
Due to the fact that all your traffic and campaign’s data is hosted on a server that isn’t yours, other persons will definitely have access to it.
I guess you’ve gotta believe they’re honest.
Protect your data
Apart from that, Voluum positions itself as a safe solution. It protects your traffic from third parties, making sure it’s not hacked or stolen.
User-friendly
This is so true. Voluum is logical and really easy to work with. It allows you to run huge amounts of traffic.
Variety of stats
It provides you detailed info on your stats. You can have structured data on your audience – country, operator, OS, type of device, conversion hour and even IP. Thanks to it, you can optimize your cost.
In case you notice that a specific device is only losing you money and not bringing enough conversions to cover costs, you can cut it from your targeting and focus on profitable devices.
Work with others
Having more people involved in your campaigns? You can invite them with different roles to separate working zones (a.k.a. “Workspaces”) and delegate part of your work to them. You can also share your selected stats that will update in real-time with people outside Voluum.
Split-tests
If you work with Single Offers, Voluum provides you a split-testing option, which means that the same traffic will be redirected to several different offers or even partners and you can see which one is more profitable for you.
Afterwards, you can drive all your traffic to the best offer or set the percentage rule on which amount of traffic will go to the most profitable offer while the rest of the traffic can keep being tested with another offer.
This approach will increase your profitability in the future.
AI Powered
On top of that you can use Voluum’s AI calculations to find the most profitable landers and offers and automatically optimize the amount of traffic coming towards them.
Sudden spike in conversions? You don’t have to waste time monitoring your campaigns, Voluum will drive more traffic where it can generate more income.
Landing pages’ tests
Voluum also gives you the opportunity to rotate different landing pages for different offers. Indeed, you can always test, optimize and also adapt this parameter.
Voluum Platform Overview
Let’s take a look at Voluum’s platform!
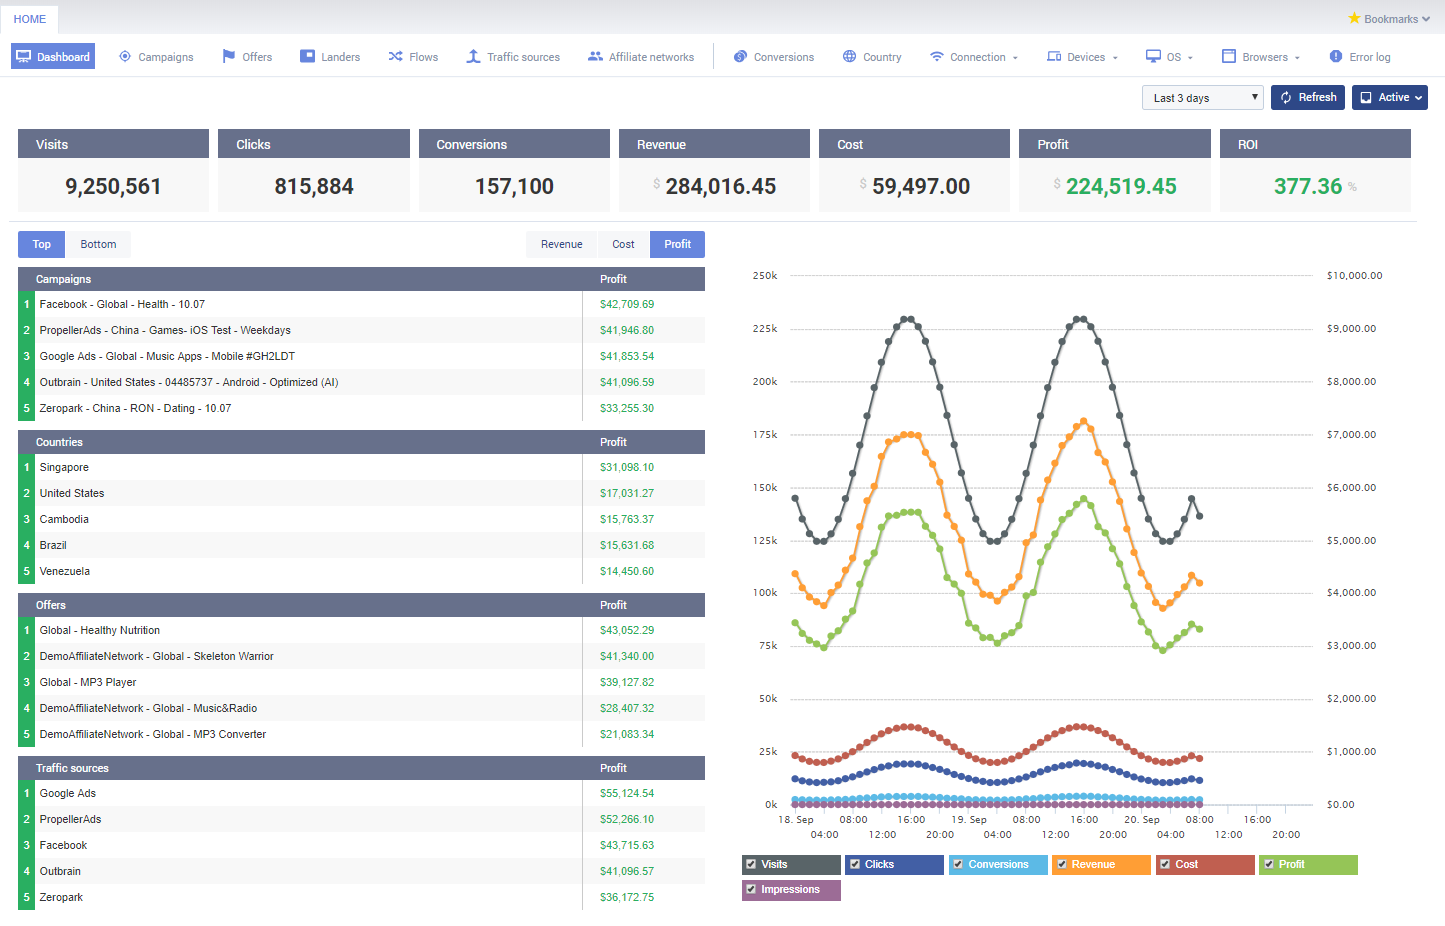
By logging in to Voluum, you’ll be directed to the Dashboard (picture below).
There, you can check stats on campaigns and offers which are running as well as the graph to visualize your results.
On the top, you can see some brief info about overall performance.
You can see Visits, Clicks, Conversions, Revenue, Cost. You can check Profit and ROI for the selected period, just above.
On the left you’ve got info on your top 5 campaigns, countries, traffic sources and offers along with the corresponding profit.
On the right, you have an interactive graph with access to the overall performance parameters.
Honestly, the dashboard tab isn’t actually something that’s normally used by Media Buyers.
What matters to them is this: the more detailed campaign list, which is shown below.
You can access it by clicking on the Campaigns tab.
Here, you can see the main menu panel with the campaigns tab selected.
I’m gonna go through it and check all the menu tabs in one of the next articles.
Want more?
I’ll also give you some guidelines on how to set your Voluum account and launch those cool campaigns!
In campaign tab (picture below) you can see all your campaigns which are running at the moment, along with the stats.
You can access a large variety of parameters: Impressions, Visits, conversions, average CPA, CPC or CPM.
By clicking on each of your campaigns, you’ll land on the offer stats. If you’re doing a split-testing of different offers, you’ll see stats on each of them and will be able to estimate corresponding performance (see example below).
Moreover, if you’re running several landing pages for each offer you can also check stats on them by clicking on the offer.
We’ll check split-testing and landing pages in the next article so don’t worry about it just yet!
You can further analyze the performance of your offers by different parameters.
For this purpose, Voluum provides you very useful filters.
You can play with them and analyze your performance from different perspectives.
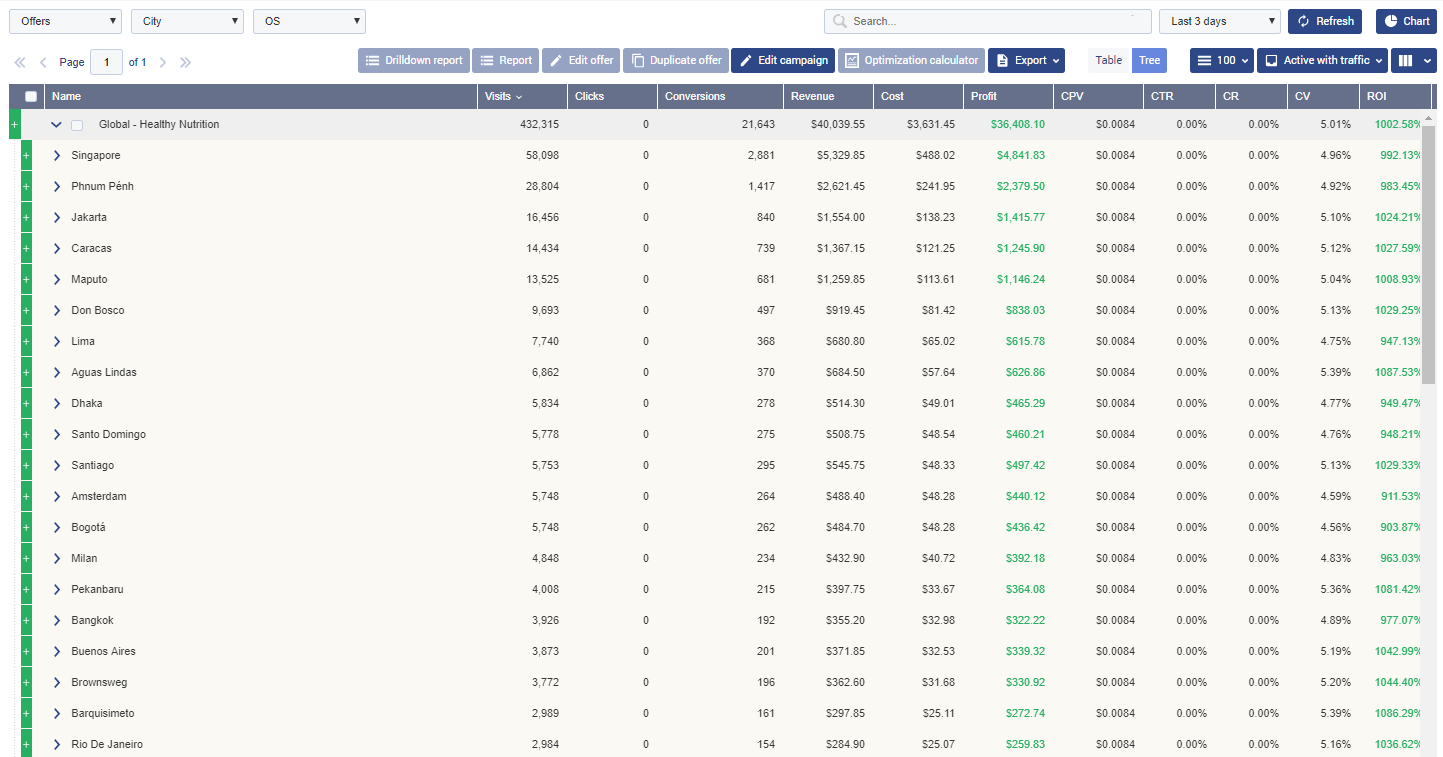
Let’s say that you’re running an offer in several countries or you’re promoting a Smartlink which has different offers for all the countries.
In that case, you can set up filters in order to see which country is performing better for this offer.
Then, you can go into even more detail and see how different OS behave for each country in terms of profitability.
Here’s the picture of how filters look like.
Your stats
As you can see, you’ll end up working with tree-structured filters.
You can organize the process of your stats, analyzing them as you wish. You can sort filter options by default.
In fact, you can sort options such as Affiliate Network, Brands, Browsers, Browser Version, City, Connection Type, Conversions (clickid info), Country, Day, Day of the Week, Device Type, Hour of the Day, IP, ISP, Landers, Language, Mobile Carrier, Models, Month, OS, OS Version, Offers, Referrer, Referrer Domain, or State/Region.
Apart from that, you can set your own variables which you wanna filter by and see the stats.
These variables depend on your traffic source.
Here’s another cool feature that Voluum has in store for you:
Voluum has templates with tokens and postbacks for many popular traffic sources (we call this ‘template integration’) but also it is integrated with selected traffic sources on a much deeper level (‘full integration’) that allows you to synchronize costs and set auto-rules.
Just pick the one you want and set the Campaign URL correctly.
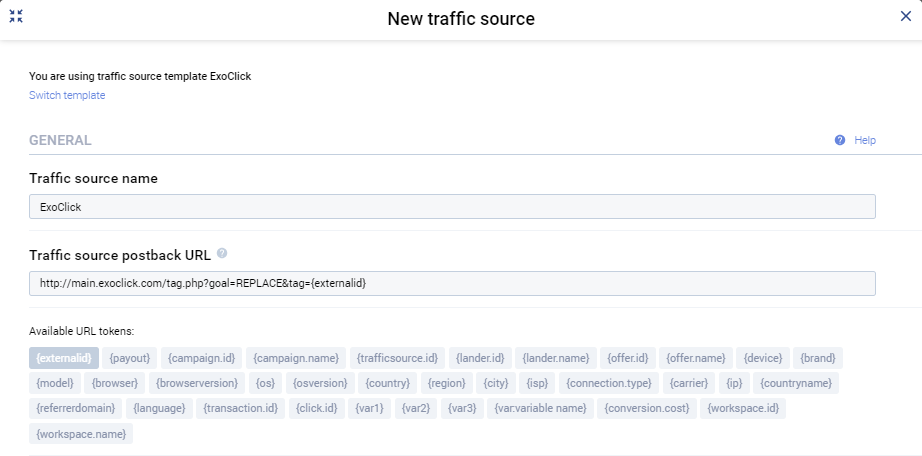
Here you can see a list of default traffic sources in the Traffic source tab.
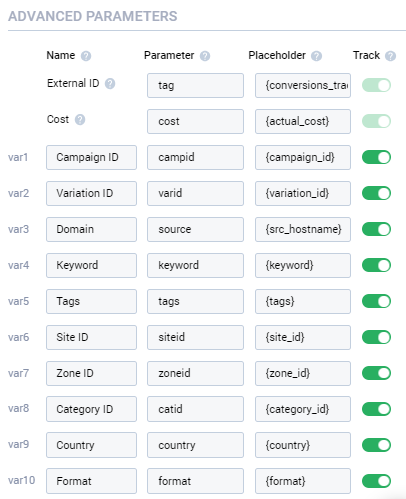
If you select one of them (let’s see the example of ExoClick) on the advanced settings of the traffic source tab, you’ll see parameters that are already predefined.
Those parameters will appear on your filters and you’ll be able to see full stats on them.
For this to happen, you need to set your Campaign URL correctly.
Wondering how to do it?
No worries!
I’m gonna tell you all about it in the next article!
Here’s an example of which additional filter options you’ll see in case your traffic source is set as ExoClick.
This way, you’ll be able to check your stats by such parameters as Campaign ID, Variation ID, Domain, Site ID, Zone ID, and Category.
Using the filter options, you can check (for example) how a specific campaign on ExoClick behaves by selecting the Campaign ID option.
If you apply another filter (for example, site ID) you can understand which sites on that specific campaign are doing great and which you’d better cut in order to avoid losing that sweet cash.
If you apply a banner ID filter, you’ll have stats on which banner is working for that campaign and which isn’t.
In addition, you can go into even more detail.
How?
By applying all 3 filters available (Campaign ID – SiteID – BannerID) you can check which banner is the best for a specific site on that specific campaign.
Let’s see another example of a demo account.
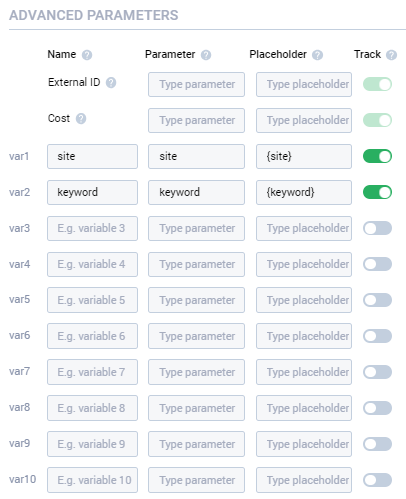
Since the traffic source isn’t pre-defined on the advanced settings, variables are set manually.
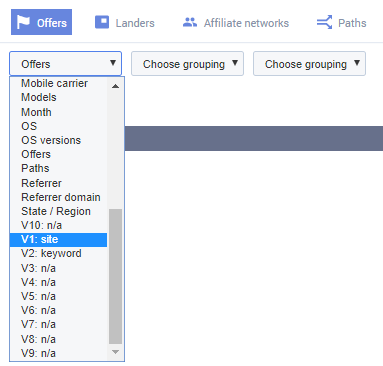
On the picture below, you can see that 2 additional filter options have appeared: Variable 1 and 2, which will allow you to filter by both site and keyword.
This is the result of applying filters.
For each offer you can see the website ID, then a keyword, and the corresponding performance.
You’ve got a whole lotta combinations of 3 drop-down filters available in order for you to find the perfect way to analyze stats.
How to Add a New Traffic Source on Voluum
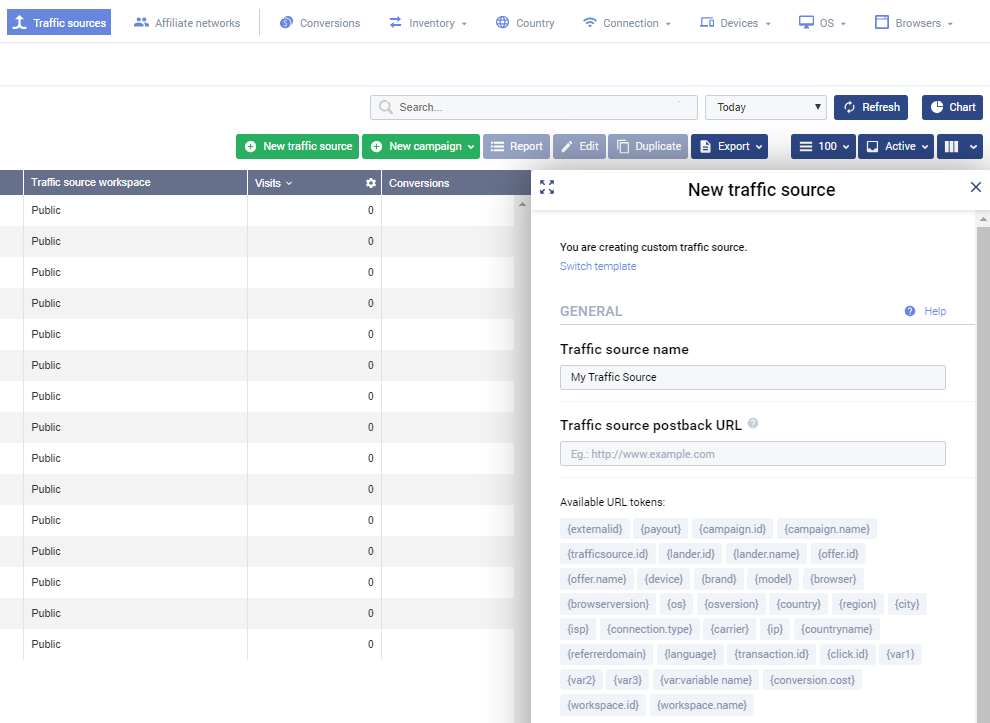
First of all, you need to set your traffic source in the traffic source tab, clicking the option “New traffic source.”
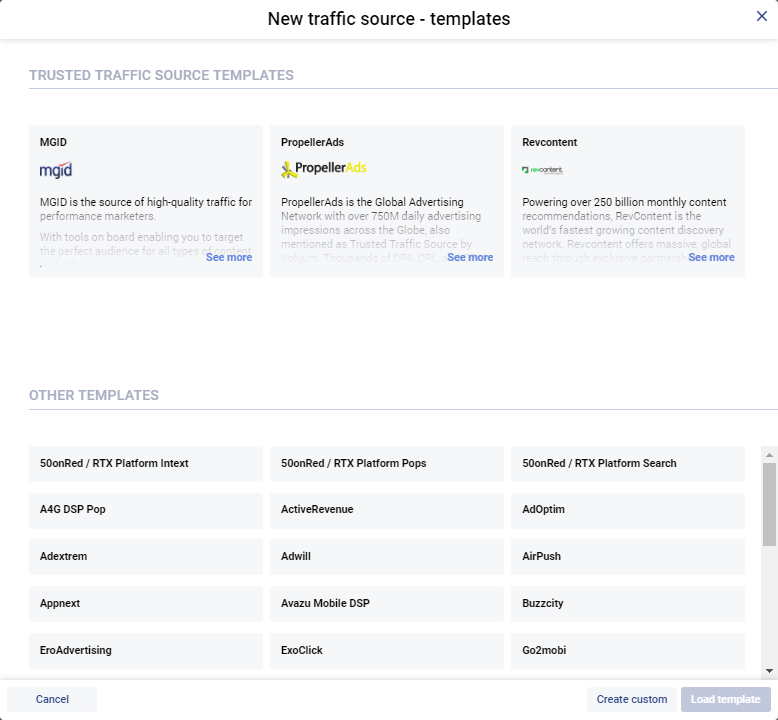
You should first check the traffic source templates available since Voluum already has an integration with the most popular ones.
In case your traffic source is on the list, you should definitely choose it because you’ll have an easier time integrating parameters.
Can’t find your traffic source?
No worries.
You can manually integrate all parameters.
If your traffic source is not part of the predefined lot, you need to insert its name and integrate the postback URL, which should be provided by your traffic source.
You need the postback in order for Voluum to send info about the conversions it gets from the affiliate network to your traffic source.
Let’s look at an example of a postback URL integration on ExoClick.
ExoClick is on the list of predefined traffic sources.
This means all parameters and the postback URL are automatically set.
Where goal is your internal unique ID on ExoClick, tag is the clickid parameter of ExoClick and {externalid} is the clickid parameter of Voluum.
Basically, what you need to do in order to set-up the postback correctly is to equate two clickids parameters — from both your traffic source and Voluum ({externalid}), inside the postback URL.
Next step: you should take a look at the “advanced” tab inside the Traffic Source sheet.
If you’ve set a pre-defined network, there won’t be a lot of extra stuff to do apart from investigating which parameters you’re able to track.
Let’s look at the same example of ExoClick.
Here, you can see such parameters already integrated:
custom variable1 – campaign ID; custom variable2 – variation ID; custom variable3 – domain; custom variable4 – site ID; custom variable5 – zone ID; custom variable6 – category ID; custom variable7 – country; custom variable8 – format.
Now you’re asking yourself: why would I need them?
The answer is simple: when you start running your campaign, you’re gonna be able to see the stats filtered by each of these parameters.
This makes it possible for you to check how much profit a specific campaign has brought you, or how much a website has lost.
This way, you can decide what to do knowing exactly what’s going on, becoming able to improve your performance and get that tasty cash!
Here’s something you’ve gotta know right now:
The more parameters you have, the more variables to optimize you’ve got in your pocket.
Therefore, you’ll be able to get on a full-granular mode, checking remarkably specific details and taking Media Buying analysis to a whole new level!
Don’t use a predefined traffic source?
Apart from setting your postback URL, you need to get to know what sort of parameters your ad-network is gonna be able to provide.
That’s the only way for you to successfully set custom variables on the “Advanced” tab on “Traffic source”.
Integrate Voluum With Your Affiliate Network
Just like what we’ve seen in the case of traffic sources, there’s a bunch of predefined affiliate networks to play with as well.
By choosing one, it’ll provide you a global postback URL, which you’ve got to insert on your affiliate network.
Here, you’ve got several options to choose from.
You can click the first option in order to automatically add the clickid to your offer URLs.
Moreover, if you know that your affiliate network works in such a way that you’re able to have several transaction IDs with the same click id (which means that one clickid can have many conversions subscribing/installing various products at the same time), I suggest you accept duplicated postbacks.
If you’re using Mobidea, I recommend you enable this option.
If you personally feel that you only want to receive postbacks from specific IPs, you can set it all up on Voluum.
Setting Up Your Offer on Voluum
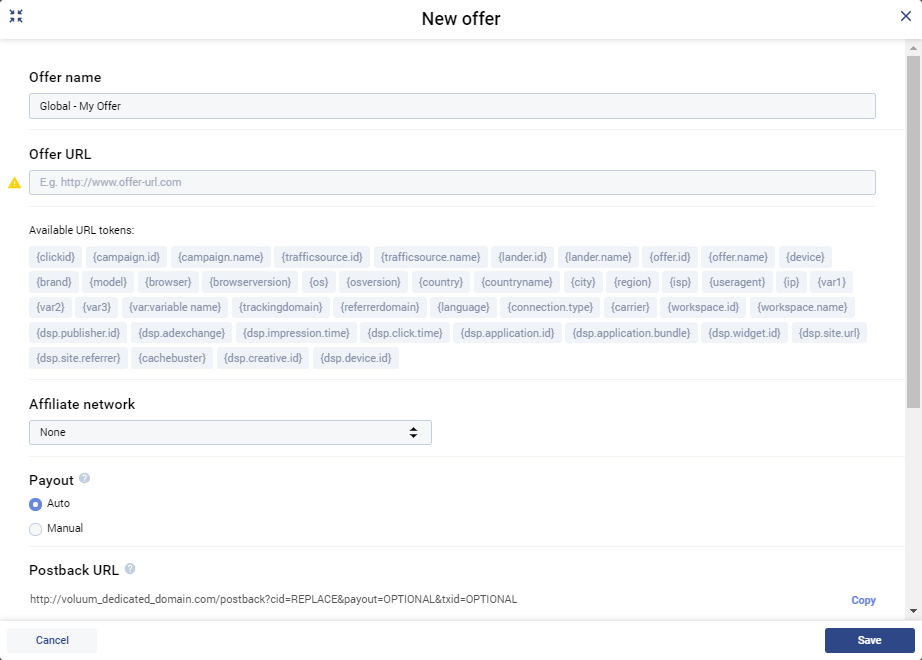
You add offers from the Offers tab.
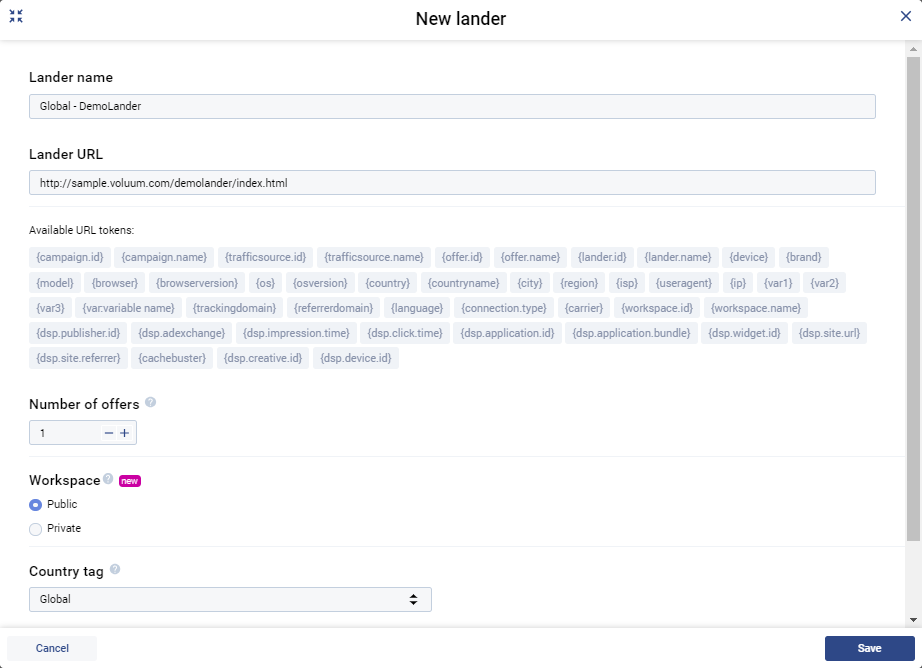
Here, you need to specify the name of the offer and then add your offer URL on the URL tab.
If you work with a Smartlink, you can create only one offer and insert your Smartlink URL.
We suggest you pick “Global” as a country.
Why?
Because — as soon as you start sending traffic to this offer — the Smartlink will automatically detect the country, sending your user to the best offer according to his segment.
On Voluum’s stats, you can sort by country and analyze the performance of each one.
If you’re working with a Single Offer, you’ll need to create a different offer on Voluum; one that’s aligned with different offers from your affiliate network.
Want more reasons to pick “Global” as your preferred country?
Here we go:
The offer can be available for several countries, avoiding offer duplication;
Let’s say your traffic source fails to provide you traffic from a selected country only.
In this case, you can normally have a safety fallback in your offer, and your traffic will be redirected to another offer according to the country and won’t be lost.
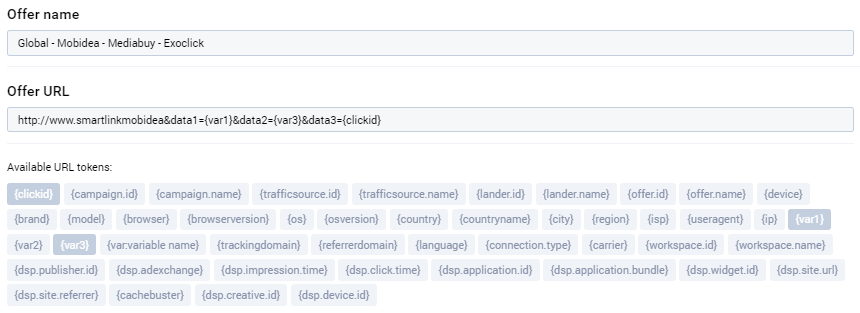
Furthermore, in this step, you need to set dynamic tracking parameters (depends on the traffic source) which you want to send to the stats of your affiliate network.
Var1 represents the campaign ID on ExoClick, and Var3 represents domain.
By aligning these parameters with Mobidea’s internal parameter, you can get to check more detailed stats on Mobidea.
Here is the example of how we set parameters, using ExoClick as a traffic source and the Mobidea Smartlink®.
Don’t want to send more detailed stats to your affiliate network?
Then you’ve only got one single parameter to set:
That’s the ClickId parameter equal to the clickid parameter of your affiliate network which, in the previous example, was data3.
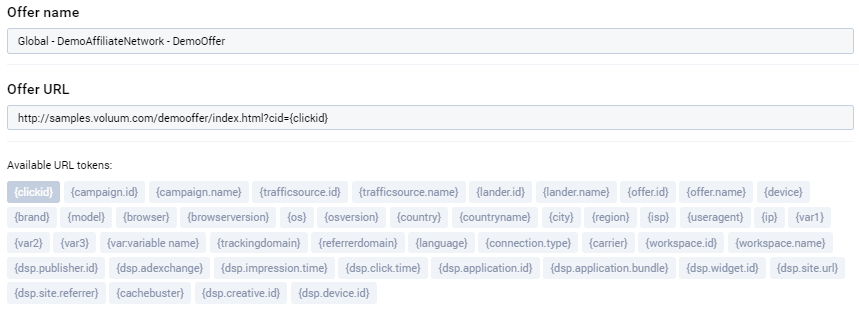
Here’s another example where cid is the network’s clickid parameter.
After that you need to choose the affiliate network which you have already set in the previous step.
The postback for your affiliate network will show up after you’ve saved your offer.
You need to replace the parameters marked as REPLACE according to your affiliate network and place this postback URL on their side.
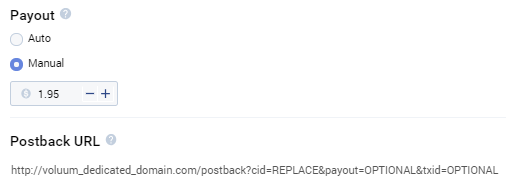
If you know the offer’s payout, you can set it manually, as shown in the following example.
However, if the value of your payout varies, you should then replace it in your postback URL.
http://csoku.voluumtrk3.com/postback? cid={{DATA3}}&payout={{MONEY}}
where {{DATA3}} is the clickid parameter of Mobidea,
{{MONEY}} is the parameter of the dynamic payout on Mobidea.
When the offer is set, you can get moving to the next step: adding a pre-lander.
Here, the only thing you’ve gotta do is add your pre-lander URL on the tab.
You should keep the “Country” tab unchanged, for the aforementioned reasons.
In case you rotate your offer, you can pick a number of offer parameter that’s equal to one.
How to Create the Flow
This option opens up a lot of possibilities.
Basically, it allows you to decide how you want your traffic to be distributed.
For example, let’s say you wanna split test, sending traffic to different offers.
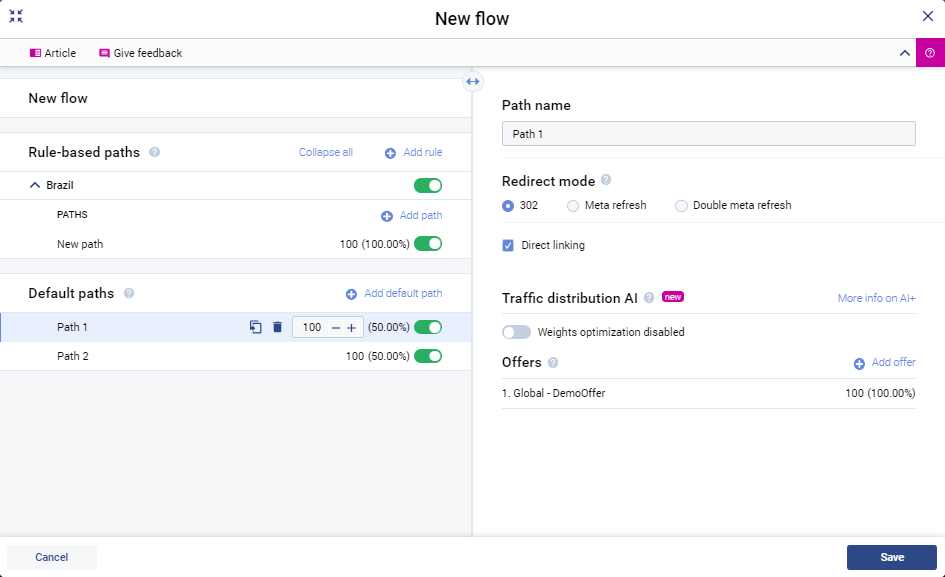
On the flow tab, you can create several paths for your traffic.
In fact, you’ll even be able to determine the percentage of traffic that’s gonna be driven to the offer.
This can be really helpful.
This way, you can send a great deal of traffic to the best-performing offer.
At the same time, by sending a smaller amount of traffic to other offers, you keep testing offers and checking what works best.
If the situation changes, you can easily redirect your traffic to the one that becomes the most profitable for you!
In this section, you can also set whether or not you wanna use direct linking.
This makes the user from your traffic get instantly redirected to your affiliate network’s offer.
Looking for something else?
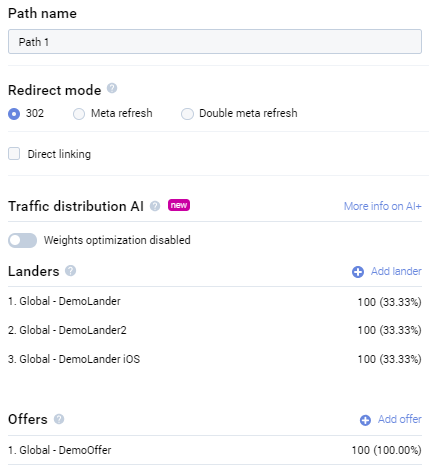
As you see in this example, you can also set an additional step before users see the offer.
In this tab, you can add several pre-landers for specific offers and test them in order to understand which one’s working better for your offer.
In this case, pre-landers will rotate each time the offer is shown.
This way, you can estimate the performance of each set of Pre-lander + Offer Link.
As in the offer path, you can also set the percentage of traffic for each pre-lander, based on the number of times you want each pre-lander to be shown before users can see the actual offer.
Another amazing feature of the Flow section is the fact that you can create your own rules on how you want your traffic to be redirected based on conditions such as Brands and Models, Browsers, Connection Type, Country, State/Region, City, Day of the Week, Device Type, IP, ISP, Language, Mobile Carrier, OS, Time of the Day, Referrer, User Agent, and Custom Variables.
Let’s say you’ve got an offer that’s working well for all OS except iOS.
Then, you’ve got another one which works only for iOS.
In this case, you can create a path and redirect all the traffic to the first offer.
More than that:
You can create an additional rule!
You can do something like this: if the traffic comes from iOS, it goes to another path.
If you work only with one Smartlink from only one affiliate network, this feature is not that important.
Nonetheless, in case you only work with a Single offer or a combination of Smartlink + Single offer, this option may be very useful.
In addition, if you’re testing several affiliate networks and know that one is much stronger in a specific OS, the possibility of setting such a precise rule is really gonna help you boost those sugary profits!
How to Create a Campaign on Voluum
The last step before you can actually start to run your wonder campaign is here!
Now what?
You’ve gotta create a Campaign.
This is when you need to choose a traffic source, which you’ve already predefined beforehand.
Here, once again, I recommend you leave the “Country” tab empty.
Later on, it can be auto-replaced.
You also need to understand if you want to track your costs from your ad network, based on the pricing model you’re using.
You can set the CPC, CPM, or CPA value you’re paying for your traffic.
In case you work with SmartCPM, you don’t have a fixed amount of costs.
What to do?
Pick the option “Don’t track costs” because you won’t need to track them at all, will you?
Remember:
In this case, you do need to check your costs on your ad-network.
Voluum also has the option of tracking costs automatically.
However, I’ve tried this many times before.
I’ve been able to understand that – with some networks – this option may not really work that well.
Therefore, this isn’t something I’d tell you to do.
Even so, if you really wanna use it, please be sure to test beforehand, so as to be certain that everything’s tracked correctly.
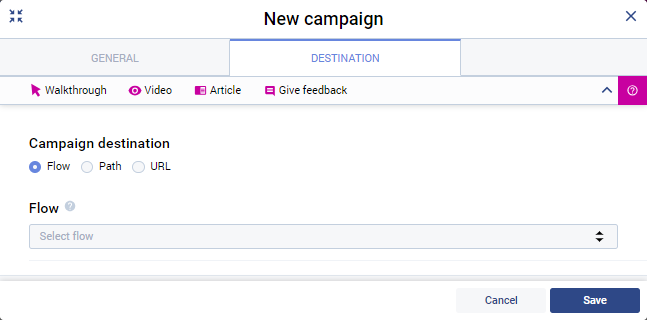
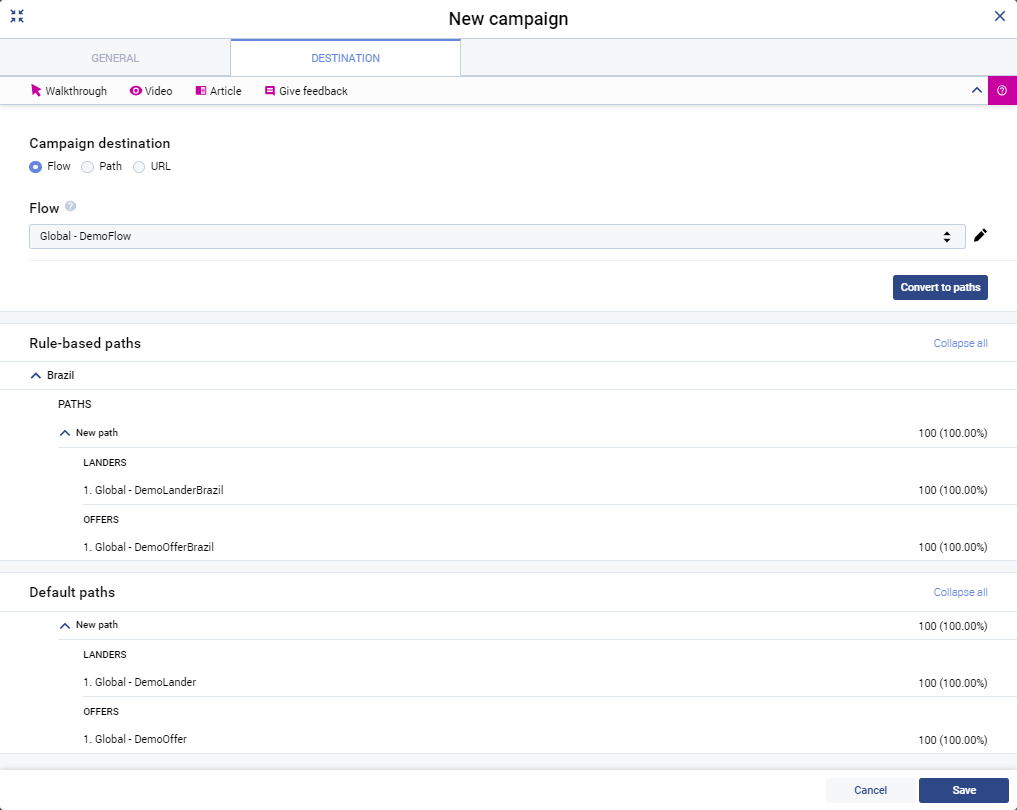
On the advanced settings tab, you can choose the flow you’ve already pre-defined on the previous step.
Apart from that, you can create a new path specifically for this campaign, choosing a new path of offers and pre-landers inside the campaign.
Wanna use the simplest option available to you?
Pick only one offer URL as the destination URL.
If you’ve selected the predefined flow, Voluum will remind you of that fact on your flow settings, showing you how your traffic will be distributed.
When you save your campaign settings, the campaign ID will appear on the Campaign URL tab.
This URL needs to be included on your traffic source as a destination offer URL in order for you to start sending your traffic to a specific offer, becoming able to track all your data on Voluum.
Conclusion
If you follow these steps, I can guarantee you’re gonna be ready to start running your campaign.
Hope this guide was able to make things clear for you, allowing you to become a master with this Voluum guide series.
Hungry for a taste of Voluum?
Wanna know how to explore a tracker everyone’s been talking about?
I’m sure you’re gonna get amazing performances, and a whole lotta paper rolls with the help of this affiliate tracker!
Good luck to all!
Get advantage of our exclusive Voluum coupon!
There are many tools a Media Buyer can use to track their performance. Check the best ones and start making it rain!
AdvertisementChecked all the Mobidea’s tutorials but you’re still feeling lost on our platform? No worries! Daliya is our dope Community…
Read this Binom review to know all the main features of this powerful ad tracker and use it to its max.
